Thursday, September 6, 2012

Healthier Living Take 2 (and 1/2)

  The health kick continues!  Joe and I are starting off well on our fitness goals.  He's made it to the gym several times and I have been to two different fitness classes at the gym, yoga (which you all ready heard about) and NIA, which is a cross between aerobics, zumba, and kick boxing and also a lot of fun.  I think my favorite part of that class was actually how much fun the instructor was having throughout (there was cackling, honest to goodness cackling).  I really feel that fitness classes are the way to go for me, but Joe does really well with taking the lone route at the gym.  What works best for you?  Any suggestions for classes I should try?

  Now on to the reason I'm even writing this post, which is the healthy dinner reviews.  I have two different dishes to review today:  Chicken Asparagus Pasta and Chicken Enchilada Casserole.

  Both of these dinners where easy to make, took little prep and were under 500 calories per serving.  They might not fit the thirds requirement that Joe and I are working towards, but they did pretty well.  First off, the Chicken Asparagus Pasta:

Don't you love the color on that chicken breast?

   This was really easy to make and a big hit with Joe (who is much less of a pasta person then I am).  I almost over cooked the chicken because I was worried that the steaming wouldn't cook it enough so I actually cooked it 90% through in the skillet before steaming the vegetables with it.  You don't need to worry though, cook it for a minute or so on each side and then steam it and by the time the veggies are done (I like mine a little al dente) your chicken will be moist and cooked all the way through.  The only other thing I will do differently when I make this next time is to stir in the feta cheese while the pasta is still hot.  We ended up with little chunks of feta instead of a coated type pasta and I think I would have liked it to be more evenly distributed next time.

Now onto the star of the week, the Chicken Enchilada Casserole:

Chicken Enchilada Casserole a la HFH.

   For this dish I did a little bit of prep the night before by shredding two chicken breasts in my Crock Pot over night.  Here is my quick and easy recipe for making succulent shredded chicken:

- Take 1 or 2 chicken breast and put them in the Crock Pot
- Cover with enough water so that there is no chicken sticking out
- Add garlic powder, pepper and salt*

*I'm from Mediterranean stock and apparently we don't measure anything when it comes to cooking (and we talk with our hands - a lot - ) so you'll have to excuse the lack of measurements, but if I had to guess I would go with 1/2 tbs garlic powder and 1/4 tbs of salt and pepper, but whatever your taste buds prefer is best.

For overnight shredded chicken:
 - put Crock Pot on low and cook with lid on overnight and/or until dinner

For same day shredded chicken:
- put Crock Pot on high for 4-6 hours

You will know that your chicken is done because:

1. Your house will smell yummy
2. It will easily pull apart with a fork (or basically as soon as you touch it)

   So I made my shredded chicken, then I used it in my casserole which has 4 ingredients (no really).

- enchilada sauce (we used a spicy red variety from the Hispanic section of the grocery)
- shredded chicken
- 1 bag of Monterrey Jack cheese (again,the cheddar allergy and also what is up with the inability to find light pre-shredded cheese in the Pacific Northwest?)
- 8 small whole wheat tortillas (which was a whole package)

   This turned out really yummy.  I think it's our favorite healthy dinner so far, but it does come out a little dry.  To combat the dryness we just slathered on more enchilada sauce (at 15 calories per serving we figured it was safe to use as much as we want).  I also ended up adding a little salsa to my portion as I am a salsa addict.  :)

   I hope you've been enjoying the healthy recipes so far!  The weekend is coming up and Joe and I have some big plans for chips.  That's right - chips!  Potato chips (specifically kettle cooked salt and vinegar ones) are an all time weakness of mine.  To help fight these cravings we are going to be trying three different styles of healthy chips:

1. Crispy Kale
2. Spicy Sweet Potato
3. Microwave Herb Potato

  I have a feeling that the spicy sweet potato ones are going to be my favorite!  I'll keep you posted on how those go.  Look for more healthy recipes soon (did someone say healthy butter chicken?  Umm... yes, please and thank you).

Tuesday, September 4, 2012

Healthier Living Take 1

  It's all ready September!  This means that the fall/winter feeding frenzy is about to begin!  "But I didn't meet my summer fitness goals yet!"  You might be saying (I know we are).  Fear not, for Joe and I are embarking on a fitness/wellness plan to help our lives and our waists get back on track and you can follow along with us here...

  Believe it or not, this first recipe is actually a remake of one of our favorite comfort foods - Mac and Cheese.  I know it doesn't sound like we're actually taking our new goals seriously, but after running around all of Labor Day weekend, Joe and I have both come down with some sort of sniffle, which in turn demands comfort food.  To keep us from giving up on the very first day, we turned to Spark People and their list of fantastic recipes.  Then we sat down and discussed what foods we were interested in making for breakfast, lunch and dinner throughout the week.  Unsurprisingly, the very top of Joe's list was the Baked Mac and Cheese (which I also have Pinned under Food I Need to Make).

  The recipe is easy to follow and the ingredients are pretty inexpensive, especially because we were going to make four meals (two for each of us) out of this.  We substituted healthier whole wheat shell pasta for the elbow macaroni and we couldn't find light Colby-Jack (Joe has a cheddar allergy) so we just used regular.  In the end, it came out more like a macaroni casserole then actual mac and cheese (I'm basing this off of my love for Kraft), but it was still tasty and surprisingly filling.  In the future, we might try and change the amount of cheese to make it taste more cheesy and less of the Dijon mustard.

   The final calorie count ended up being 500 calories for 1/4 of the casserole dish (using the recommended 8x8), which is exactly our calorie target for dinner.  Did I mention that this is really filling?  I didn't feel the need for a snack later (a bad habit I am trying to break myself of, even if it is fruit or veggies).  Joe and I are trying to eat based on the idea of thirds; that is that you should have a third of carbs, protein and fat to what you're eating (notice which one I put first!).  This dish probably wasn't a perfect balance of thirds, but it was pretty close.

This is what one portion of the Baked Mac and Cheese looks like.

   Aside from just changing our diets to incorporate more fresh and healthy foods and less eating out, Joe and I are working on personal fitness goals as well.  I just had my first yoga class ever today!  (Is there something easier then beginner's yoga?)  It was awesome and definitely helped me get in touch with my body, which mostly just reaffirmed how out of touch I've been!  I bought a Living Social deal which gave me a month of unlimited classes at a local gym and two free personal training sessions (which I have never done before, but Joe assures me will be awesome).  Joe has a membership to a different gym that he can go to after work.  We also intend to get more use out of our bikes before the weather turns and are trying to go hiking again soon (so hit us up if you are interested!).

  What is your favorite healthy recipe?  Do you have a health/wellness plan of your own that you're working on?  Please share it, if you do!

Tuesday, August 7, 2012

(Part of) My Weekend in Instagram

   Are any of you using Instagram?  I wasn't completely sold on it at first.  Mostly I just felt that it was an extra step in putting up my pictures on Facebook, but now I'm really getting into it.  I love taking pictures with my Iphone and I love all the different effects you can quickly add to them through Instagram.  Plus, Instagram is free!  I just wish I could get to it on devices other than my phone/Ipad. But I digress...

   In honor of my new love for Instigram and Iphonography in general I have given myself a goal of taking more everyday moment kinds of pictures.  To help me fulfill this goal, I have decided to show you parts of my weekend via Instagram.  Who knows, this may even become a regular thing.


Sunset over Alki Beach.  We went to get Mexican food with friends at our favorite Tex Mex place.  On our way in I pulled over to take this shot (much to the chagrin of my passengers).  I couldn't hep taking about ten more pictures of this gorgeous sunset.  I think I want to get a canvas and paint it in those colors.  Maybe I'll do that trick where you place stickers on the canvas first to create a white phrase after you paint it, but then I'd have to think of something witty and I'd have to find somewhere to hang it. 

These pretty candied apples at Pike Place Market caught my eye.  Luckily they were far too gorgeous to eat, which means that I didn't have to try and estimate their calorie count!  (I think that would have been enough to stop me even if they hadn't been so pretty)

  I thought that I had taken more pictures when I started this blog post, but apparently they were just several shots of the things you see here.  ::sigh:: I guess this means I didn't do so well on my goal to take more pictures of the everyday moments.  Oh well, better luck next weekend...

   Do you have an Instagram account?  If you want to follow me search for Charmingfox. 

  How do you celebrate the everyday moments in your life?  Do you enjoy using your camera phone to document what's going on around you or are you strictly a camera photographer?  Let me know in the comments!


Tuesday, July 24, 2012

I (might) Need an Intervention...

  As many of you know (and can sympathize) I am addicted to the wonderful, time absorbing hobby that is Pinterest.  If you're not on Printrest I would say that you should count yourself lucky, but that would be a lie. As much as I sometimes hate myself for spending hours on this amazing site, I also find some of my favorite crafts, recipes and tricks for around the house here and I wouldn't give it up for anything.

   Not on Pinterest?  Ask for an invite.  All ready on Pinterest?  Follow me!

   I have literally hundreds and hundreds of pins and I love Pinterest so much that I have decided to start sharing some of my favorites with you here.  You've seen the Broccoli Pasta fiasco (delicious mess that it was) and that came from a Pin I have on my Food I Need to Make board. I'm hoping just sharing from one board at a time or so will have it feel like less of an overload, so here are a few of my current favorites from my Pinterest recipes:

  These cucumber rolls seemed a little tricky to me for the bridal shower I was throwing, so I just made the filling, which was delicious with a host of fresh veggies for dipping.

  I have made these amazing crostinis as appetizers and for my lunch many times and they are always a big hit!

  I use this as my go to Chicken Piccata recipe and it is one of Joe's favorite dinners.

   I have over 157 recipes and food ideas pinned to this board and I have another entire board just for desserts!  (Can you see how Pinterest really brings out the OCD in me?  I love it!)  Now if only I had time  and the pantry to actually cook some of these recipes I would really be in heaven.  :)


   Do you have a favorite Pinterest recipe?  Which recipe that you've pinned are you most excited to try, but haven't yet?

Monday, July 16, 2012

Adventures in Gardening

   I think tomato plant is my new favorite smell. The lush, green, new smell of the growing plant is something I'm finding hard to put into words, but if I had to I guess I would just say "summer".

   I've been trying my hand at container gardening this year. Four medium pots just out on the steps leading to our little yard. Unfortunately my initial attempt was not as successful as I had hoped. Our little yard is very shady. Good for keeping the temperature in the apartment down, but not so good for growing my little plants. There seems to be just enough morning sun for my tomato, oregano and strawberry not to die, but not enough for them to really thrive.

   I also started too early. Apparently May was way too ambitious of a start date for potted plants in Seattle. The weather simply refused to cooperate and my first attempt at basil died within only a few days. I quickly moved the tomato and strawberry into the house (the oregano was miraculously fine), but then again there was the problem of not enough sun even though they were in front if the glass sliding doors. Eventually I started carting then out to the curb on mild, sunny days in the hope of relieving their anemia.

   My efforts must have been just enough because it is now mid-July and I currently have one tomato and one strawberry flower to show for all my efforts. The oregano is doing fine. I bought another basil at Trader Joe's and simply left it in the container I bought it in and that hasn't died (yet). I also have a surprise. On a whim I took some old looking garlic cloves and put them in the pot the original basil plant had been in and they have actually sprouted!

   I love the idea of a kitchen garden, but I'm really glad I only tried growing a few things in pots this year. Perhaps, if we move, I can try something a little more elaborate next year or maybe just a few more pots.  How's your garden doing?


Do you see the one, tiny tomato flower?!

Monday, July 9, 2012

Hiking Mountains and Glacial Lakes


   Sunday Joe's friend Steve invited us out on a hike.  Joe and I were thrilled at the idea (we have been meaning to get outside more) and so that morning Steve, his friend Russ, Joe and I all jumped into Steve's car to start our hiking adventure.

   We drove out into the Cascade mountains for what we were told was a "beginner" trail, or maybe we were just told that there were beginner trails, but not necessarily that we were going to be on one.   We were originally going to hike to Snow Lake, but that trail was still covered in (you guessed it) snow.  So instead we hiked the Ida Spring trail up to Mason Lake.  We packed up our water and put on our sunblock and hiking shoes (Keens for me, Vibrams for Joe and Steve) and started up the mountain.

   Here are a few things that I learned on my way up:

     1. It does actually get hot in Washington.

   I was actually beginning to doubt this, what with June's weather being most aptly described as June-uary, but I does get quite warm here in WA.  Everyone had promised that July 5th was the magical day when summer arrives and so far, they have been absolutely right.  Also, once you get over the mountain pass you actually end up in a very arid/dessert like section of WA, which is something I keep forgetting about since I live near the sound.

     2. Bring more water then you think you will need.

   I should have remembered this from living in an area that gets into the 90s all summer, but I guess I sort of spaced out, because Joe and I only brought one Nalgene a piece.  Luckily, Steve was well prepared with extra water for all - go Steve!

     3.  The view is worth it!

This was actually taken on my Iphone using a free app called DMD that takes panoramic photos.  You can just make out Mt. Rainer in the photo, but in real life it was stunningly present.

   Once we had reached the summit, we then hiked down into the forest and to Lake Mason, which was actually my favorite part.  I've never been to a glacial lake before and the water was exactly what I expected and needed after our long hike up the mountain.

Lake Mason aka the prize at the end of the trail.

   The water was refreshingly freezing on my calves as I soaked up to the knees.  More adventurous hikers actually jumped in (and quickly jumped back out), but I was content with simply soaking my legs to the point of numbness.  The water was crystal clear and the Snickers that Steve handed  out really hit the spot after the long hike in the sun.  If you look closely at the picture you can just make out some snow still clinging to the slopes.  

   The hike back down was actually really relaxing after the hike up and the respite at the lake.  All in all the trip took several hours, 9ish miles, 200-something flights of stairs and burned 3,367 calories!  (stats courtesy of Russ's pedometer).  Afterwards we were starving and went out to BBQ at Stan's in Issaquah, which was really good.

   I feel like I've now been hit with the hiking bug!  I can't wait to do it again and I hope that next time we pick a trail where Bear can go too.  We actually saw a couple of small dogs on this trail, including a dachshund; however, since it was out first time hiking we left Bear at home.  

   One last pretty picture from the hike:


Have a great day everybody!


Thursday, July 5, 2012

How (Not) to Make Broccoli Pasta


   So last night I saw this amazing Pin on Pinterest for Broccoli Pasta.  I was really excited because:

 1. I love pasta.
 2. I really like broccoli.
 3. I am trying to put more fruit and veg into my diet.
 4. Joe doesn't like broccoli, but he -might- like this.

  So I decide to try making it for lunch today.  I had some time on my hands and was feeling energetic, so I thought, "why not?".  Famous.Last.Words.

  Now I want to say up front that this does taste amazing and you should totally make it, just not the way I did.  Here's why...

   First off, I don't own a steamer basket.  I know that they're not very expensive, I just don't have one.  "No problem,"  thought I, "I'll just use this strainer over a pot of water".  Little did I realize I should have put a lid on my impromptu "steamer" and also the lids don't fit with the strainer on top, so it took for-eve-er to steam the broccoli.

  Then I went to prep the garlic and this is what I found:


  Unbeknownst to me, my garlic had been sprouting in the bowl I keep it in on a shelf.  Luckily not all of the garlic I had in the house had sprouted.  I'm not sure why, but I feel like you're not suppose to eat sprouted garlic.  Since I couldn't remember why, I just cut it in half and took out the sprouted part in the middle.  

  Then it was time to start putting everything together...   This recipe requires one pot for steaming broccoli and -at the same time- another for cooking your pasta and a saute pan for putting together the ingredients for the sauce and cooking the broccoli again.  Then, it all goes into a food processor... right...

I promise I will clean all of this up as soon as I'm done with this blog post...

   So I made it through cooking the pasta (no problems there) saving a bit of the pasta water, moving the broccoli to the saute pan after sauteing the garlic in olive oil and so now I'm on to the last bit, the home stretch, the food processor!  Oh wait, I don't have one of those...  Improvisation number 2 (3?)

(This is what the broccoli sauce looks like after you have blended it for a long time with a stick blender)

   Hurray for stick blenders!  So at this point I have a literal sink full of dishes and a few dirty pots still on the stove, but it tastes delicious,especially with lots of pecorino-romano cheese (after all, who doesn't like cheese).  

   So here it is!  Broccoli pasta with shredded pecorino-romano cheese:

   There is a fair amount of olive oil (and cheese, but that's just me) in here, but I feel like the health benefits are still pretty high considering that, that is a giant floret of broccoli in there. 

   So here's what I'll do differently next time (because there most definitely will be a next time):

   1. I will not cook the pasta until the broccoli is done.  You don't need the pasta water until you're ready to put everything in the food processor so I can still saute the broccoli with the garlic and olive oil while the pasta cooks.  This is mostly because I don't like room temperature pasta and it took me too long to make the sauce.

  2.  More garlic!  I love garlic, so this is kind of a no-brainer for me.  I will also check my garlic before heading off to the grocery store just in case it has gone native without my noticing.

  So that's it.  I hope you enjoy making and eating this fantastic dish!  I hope your family does too!


Enjoy!


P.S.  I actually started typing this blog post while I was eating the pasta, which basically means I left it on the table until it got cold after just a few bites, so I can also say that this pasta is tasty reheated in the microwave for a few minutes.  Yay leftovers!  :)


Update:  Joe tried it and liked it.  We both agree it needs a few edits, mostly of the more variety (more salt, more garlic and a little more lemon).  Score one for broccoli pasta!  Also, I have eaten all the leftovers, so I will have to try and make it again soon. 

Thursday, June 21, 2012

Summer Learning - Math Edition


     This summer I am tutoring a group of really fantastic kids with a variety of learning goals.  So I thought I would share a few of my favorite math activities to make the summer learning a little less terrible.  :)

Hands on learning:

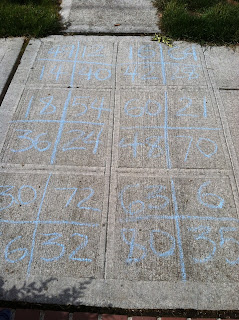
Multiplication Leap Frog
   Use sidewalk chalk to write the answers to the math problems your child is practicing (we were working on multiplication).  Make a set of squares that aren't any longer then your child can jump (I measured their jumping distance before drawing the board).  This is great because you can make as many new boards as you need and it gets your child outside and jumping!


Here's the one I made for one of my students.  We've been working mostly on the 6, 7 and 8 times tables.  I threw in a few easy ones ( 7 x 2 ) to make sure there would be a lot of success.

Multiplication Memory
   You can make a custom version with colored pencils and index cards (don't use markers or it will bleed through).  Kids will practice their memory skills at the same time as their multiplication facts.  There is also an awesome free version to print and cut yourself available on Super Teacher Worksheets.  


Online Resources:

  This fantastic site is full of FREE time tests, online games, flash cards and other practice tools.  The games are a lot of fun for the kids and are a great way to get 5 minutes of multiplication practice in every day with less of a fight.

   A great all around math site filled with free games that you can play with your kids!  Set up your own family group and challenge each other to a Multiplication Grand Prix Game.

   Sadly, this site recently put 90% of their resources for paid subscription members only, but it is still my favorite resource site.  It still has a sample of great worksheets and games for free and for $20 for a full year it's not such a huge subscription cost that I wouldn't recommend it.


  I hope this takes some of the guess work and grumbles out of your summer learning!  Do you have any great tips, techniques or resources that you use?  Please share them below!

Friday, March 16, 2012

Running, err... Crocheting in Circles...

  I have been feeling super crafty of late, which is great because we're on a school break here in WA and that means I'll actually have time to take advantage of it. :)  Too often I find that I feel the most crafty when I all ready have tons of things to do.  Here is the latest thing that I've been working on:

  I went to the Goodwill Outlet downtown and got a couple of sheets.  One of them was a massive multicolored miasma of sketchy looking flowers.  No, seriously, these flowers were sketchy... and neon.  I couldn't imagine anyone actually having this on their bed, but I knew the instant I saw it that it was going to make some awesome thread for the rag rug that I have been wanting to try crocheting ever since I pinned This on my Pinterest page.  (BTW, if you're not following me on Pinterest you should and if you're not on Pinterest let me know and I will send you an invitation because it is the most awesome thing ever!)  I don't know why the idea of a crocheted rag rug appeals to me so much, but it does and I have to say that it was not as hard as I thought it was going to be.

   Oh, did I mention I don't know how to crochet?  Well I didn't anyway.  I've been knitting since college (which is sadly more then a few years ago now), but I never learned to crochet.  It's actually really easy and there are some great videos on YouTube, which totally helped me out.  I also used another Pin from PurlSoho's blog the Purl Bee to help me with gauging the correct amount of stitches (or whatever you call them in crochet terms).  The rug is now finished, and awesome and our little Yorkie loves to lay on it because he thinks anything soft on the ground (blankets, laundry, etc) are his and for him to lay upon as he pleases.

   Crocheting the rug was actually the easiest part (despite the fact that I apparently cannot count and so I had to take it apart five different times before it stopped going all wobbly on the edges and laid flat).  The hardest part was actually turning the sheet into thread.

Early stages of the thread making process, or maybe somewhere in the middle.  I can't actually remember. (Do you see the sketchy flowers?)


  I cut the sheet into approximately 1/4"  strips by simply measuring with the width of my thumb, snipping a starting place, and then ripping the cotton fabric into strips.  I then attached the strips together to make a ball.  The pin I linked earlier explains the ball making much better then I can.  Every time I try to explain in more detail it just keeps sounding like nonsense.  Anyway, that process took hours, in fact, it took most of Sunday.  Thankfully, one of my good friends came over and was so excited about what I was making that she helped me clean the strips of the fly away threads so I could then attach them to the ball.  Having two people while making the "thread" is a HUGE help and I cannot thank my friend enough! :)

  And now for the final product...


   I know, it's a crappy picture and yes, those are my toes at the edge of it.  I'll have a better one when I put it up for sale on my Etsy store.  The rug measures about 2 feet in diameter and took several hours of work every night for a week to make (mostly because I had no idea what I was doing for the first three nights I was trying to do it).  It was a lot of fun and I'm thinking about running out to the Goodwill outlet for more sheets to make another one.  

   So, what do you think? How much would you pay for something like this?  Would you even buy one?


Sunday, February 26, 2012

Run Away Weekend - Portland Syle

   This weekend, Joe and I decided to celebrate our anniversary with a run away weekend to Portland, OR.  We had a great time!  I don't know why we keep deciding to take vacations in February to cold places, but at least we had fun.  Joe enjoyed sampling some of the local brews and we both had a good time walking around and checking out everything.   Here are some highlights from our trip. :)

Cargo is an amazing store filled to bursting with all sorts of eclectic housewares, jewelry and other novelties.


Voodoo Doughnuts, "the magic is in the hole".  The building was actually painted with sparkles and the amount of sugar wafting out of this 24 hour doughnut shop is enough to give one a cavity! 


    Out of all the amazing choices from the display case, we ended up with Maple Bacon, Oreo Cream, Portland Cream and Mango Tango.  All we delicious, but we didn't finish more than half of each one between the two of us. :)

   We also went to Pittock Mansion (which I will share pictures of later) a fantastic knitting store called Knit Purl, where I got the most beautiful yarn and a ton of amazing boutiques which we either window shopped or actually went into.  Most places were really dog friendly, which was great because we brought the yorkie along with us.  All in all it was a great weekend and with Portland only being a 3 hour drive from Seattle, I can see myself planning another trip there sometime soon.  What do you think girls, interested in a Portland trip?

Tuesday, February 21, 2012

Goodwill Outlet, Not Your Average Thrift...

  So the other weekend I went to the Goodwill Outlet in downtown Seattle and bought a ton of fabric.  The inspiration for this was that I am thinking about relaunching my Etsy store (Charmingfoxstudios)  in the hopes of bringing in a little extra cash while using my free time in crafty ways.  Now that my WA teaching license has actually come in the mail ::does a happy dance:: I can look forward to having a classroom again come next school year and therefor; a salary.  In the meantime, I am still working throughout the school year and am getting ready to start an internship come May to become a licensed therapeutic riding instructor at the barn I volunteer at.  :)  I am super excited about the internship, but it means that I will have a full time nonpaying job this summer and so money will be a little tight.

For those who haven't seen a Goodwill Outlet store before, it looks mostly like this:

(Photo from a great article about the Goodwill Outlets found  Here)

   Getting back on topic...  I went to the outlet thrift specifically because I wanted to pay as little as possible for the materials and I didn't have anything too specific in mind.  I've been really excited about the upcycled crafts that I've seen on the internet and knew that I wanted to use as much recycled material as possible.  At the outlet, clothing and other such household fabrics are $1.50 per pound!  I walked out with a giant Ikea bag full of sheets, pillowcases, sweaters and some actual large pieces of fabric.  That's right, did you know the thrift sells unused fabric?  Neither did I, but it makes sense.  I also saw a few things that made me glad I was wearing work gloves while combing through the bins, such as a pair of plus size knitted panties (just because you can make something doesn't mean you should!).

   I also found a crocheted shawl in a pretty, fuzzy yarn that I thought I might try taking apart.  I've never done this before, but it seemed simple enough of an idea at the time and I've been wanting to add to my yarn stash, but haven't been willing to spend the money.  Plus, unraveling an obviously handmade shawl should be much easier then unraveling a sweater, or so I reasoned to myself.  However, I fear I may have been bested by this thing.  The yarn has this lovely fuzzy quality to it, which makes it super soft, but also gives it a tendency to weld together,so instead of simply detaching each loop as I pull, I have to continuously stop and snip little knots of the material apart from each other, which means that something that should have taken me three minutes to pull apart has taken me upwards of three hours and I'm only halfway through!  Have any of you ever run into a snag like this?  Or have any of you ever tried to unravel a sweater for the yarn (another project I hope to someday undertake)?

   Anyway, I did end up with a decent sized ball of yarn for my troubles and I've washed almost all of the fabric I bought yesterday from the thrift, so now it's onto cutting and considering.  What should I make with my new wonderful stash of fabrics?  I had intended to make a few sweater crafts from Pinterest.com and maybe a shoe bag or two from one of my pins, but what else?  Any suggestions?